Friday, May 18, 2012

Good, Clean Fun


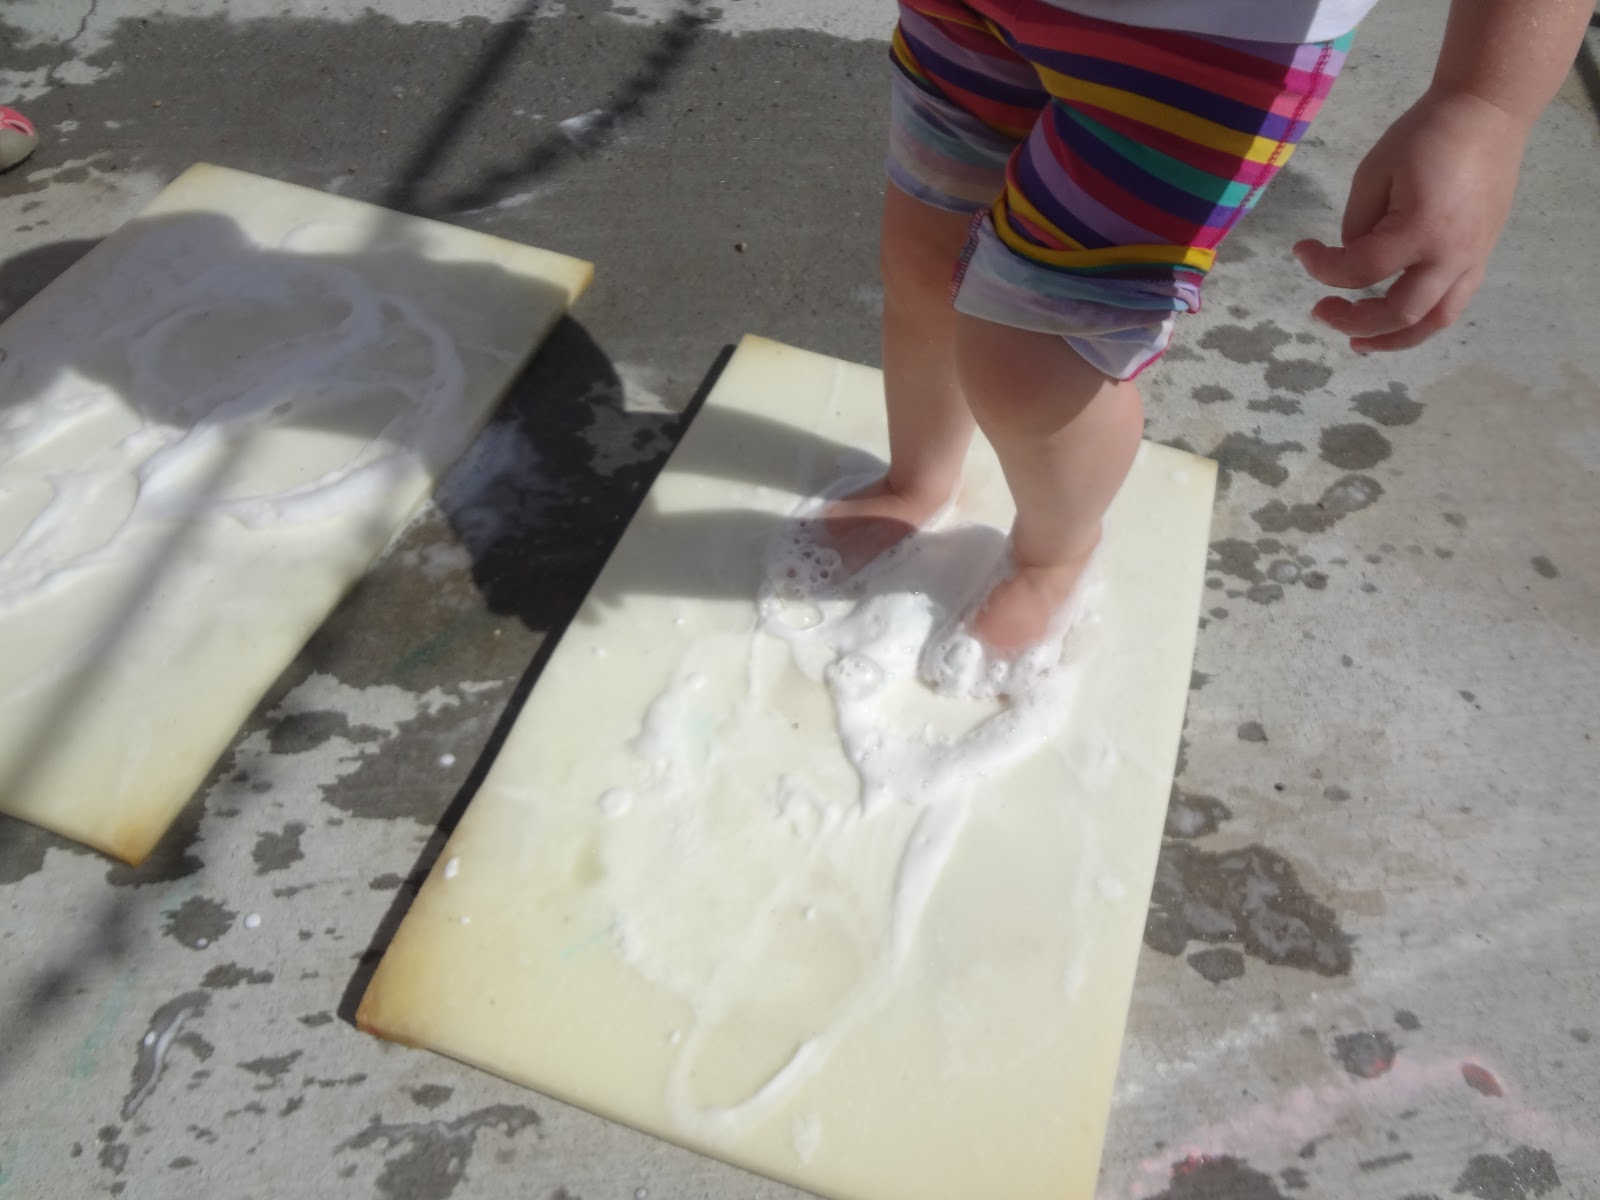
When I saw this over at Growing a Jeweled Rose, I knew I had to find some sort of giant sponge type object. We had a couple nap mats that had some tears in them so we have been using them outside to sit on. I took the pads out and squirted some dish soap on them. I gave the kids some water in watering cans and let them get to work. I did not say anything about the bubbles or what to do. It was so much fun to see them stomping on the sponges to discover the bubbles coming up. What I love is that when we are done, we simply hose off the sponges, patio and kiddos! They ask to do this everyday, so I bought a bottle of dish soap just for outside. It's a great experience for cause and effect, sensory, problem solving, using their social skills, and using their large motor skills! Click HERE, to see how what they used for a sponge over at Growing a Jeweled Rose! Thank you so much for the inspiration, Jeweled Rose!


Pin It

Thursday, May 17, 2012

Gigantic Ball Paintings

We have been taking full advantage of the incredible weather we have had in our part of the world lately.  I picked up this plastic pool for about $10 at the hardware store. These pools are everywhere right now.  I taped down some paper to the inside of it and gave the kids some paint to squirt into the pool.  Then we threw in some plastic balls.  This project takes lots of communication and cooperation on the part of the children.  It was amazing to see them work together and figure out how to tilt the pool back and forth to get the balls in motion.  It was a whole body experience for these kids.
 Some of the skills they used during this process were, cause and effect, identifying/ recognizing colors, problem solving, learning and using social skills,  using their large motor coordination, and pre-writing skills (squeezing those paint bottles and squirting the paint) just to name a few!
 Pools....not just for water anymore!


Pin It

Tuesday, May 1, 2012

5 Little Speckled Frogs

Let me preface this post with....I am no artist!  I actually am not very crafty either.  I can come up with ideas and they look great in my head, but when they come to life, ummm, not exactly like it was in my head.  Anyway, we love singing the song "5 Green and Speckled Frogs". So I thought it would be fun to have a little visual to go along with it.  I created these little frogs on a log
puppets for the kids to use. It was super simple and made with what I had on hand. 
I cut a egg carton up into 10 cups, then painted them green.  I added some speckles with green marker.  Then I cut out red tongues and glued them in.  I glued the cups together and added some goggle eyes.  I cut out a "log" from the egg carton and painted it brown. Voila!  Done.
Here is a video of the song in case you have no idea what I'm talking about....


Check out the adorable frogs that they created over at Rainy Day Mum with egg cartons and a paper towel roll!  So cute!
Pin It

Tuesday, April 24, 2012

Abstract Toddler Art


I set this up this activity for my littles (18 months) the other day. We have lots of scrap paper and I can't seem to throw it away, figuring we could use it for something.  My littles love tearing paper (which is an excellent way to strengthen those little hand muscles) so, I taped sticky paper to our easel, sticky side up, and the littles tore and stuck paper until their little hearts were content.  I kept this up all morning and one little girl stayed with it the whole time.  Sticking, tearing and removing paper.  So great for fine motor, color recognition, cause and effect, hand/eye coordination, sensory, problem solving and creativity....just to name a few!  


Pin It

Thursday, April 19, 2012

Paint with Fizz

We are always experimenting with baking soda and vinegar.  We made FIZZ, we used it to blow up a balloon, made sidewalk paint with it, and of course, the good 'ol Volcano.  I thought it would be fun to make some paint with baking soda and see if we could make some fizzing paintings.  I mixed baking soda with watercolors (you can use food coloring too) until it became a paint consistency. I put vinegar in jars with droppers.  The kids painted their pictures and then drip dropped the vinegar onto their paintings to fizz them up!  Super fun and easy!  The pictures do not do this experience justice AT ALL!  Go ahead and try it, you and your kids will love it!


Pin It

Tuesday, April 17, 2012

Painting with Pineapple Leaves

Did you know that you can paint with pineapple leaves?  I actually have never thought about it, but my kiddos sure did.  While cutting up our pineapple, my daughter pulled each and every leaf out of the top of it.  Then asked for some paint.  Why not?  We got out the paint (yellow and green for pineapple colors, of course) and some paper.  That's all it took to set these little artists up!  It is always fun to paint with unexpected materials.  Keeps the creativity fresh and challenges those developing minds to think outside of the box.  Pineapple leaves will no longer be seen the same in this house!


Pin It

Monday, April 16, 2012

Colored Rice (The Easiest Way)

One of my kids most favorite sensory materials is colored rice.  It feels nice and makes a pleasant, soothing noise when dumping, measuring and pouring.  Playing with these types of materials help build math skills, small motor skills, color recognition, sensory awareness and language development.
 When I first began coloring rice, I use to put it in a ziplock baggie, add the color, add rubbing alcohol, zip it up, shake it, dump it out on paper towels to dry and try to keep the fumes from burning my eyeballs!  One day, I didn't have any rubbing alcohol, so I just added the color.  Much easier!
First, gather your colors.  We used THESE watercolors from Discount School Supply.  The process is super simple.  Pour some white rice (we bought a medium size bag at the grocery store for about $4), into a bowl.  We didn't measure, just poured in a good amount. 

Squeeze in some color
Stir it up (no need to add alcohol)  If you want it darker, just add more watercolor

Dump it into your tub and add the next color, no need to even rinse the bowl out, and the rice is instantly dry!


The colors come out beautiful and no stinky alcohol smell. 

Just a quick note, this batch of rice got caught outside in a rain storm  We let it dry out and it is perfect again.  It will last indefinitely, so this is a great little investment that goes a loooonnnngggg way

P.S.  This method works for coloring any pasta too!  You know for all those noodle collages and necklaces! 


Pin It

Wednesday, April 4, 2012

Painting with Wind Up Toys

Do you have any of these cute little wind up toys?  What do you do with them, really?  We painted with them!  I got out our handy, dandy box lid, put some paper in it, let the kids squirt some paint, wound them up and let them go.  Serious giggles!  It was super fun to watch them waddle around in the paint.  The kids did lots of problem solving when the toys would get stuck in the paint.  Great fine motor skills involved as well. So fun!


Our end result! 

Pin It

Monday, April 2, 2012

Pool Noodles and Golf Tees

There are lots of fun things to do with pool noodles.  I think noodle-sword fights are my kids favorite.  I have seen them cut up and used as blocks, stringing them on yarn, stamp painting with them, cut in half to create marble runs with and many others.  Just search "pool noodle" on Pinterest and you will have loads of ideas at your fingertips.  What I like, is you can find them for less than 1.00 right now!  So I bought some, we had a few battles with them, then I cut them into smaller round circles. Then, I set them out with the golf tees and let the kids create. 


Of course, T made a robot!


Great for fine motor development, creativity, problem solving and sensory.

Pin It

Saturday, March 31, 2012

Drawing Robot

I was totally in awe and inspired when I saw these "ART BOTS" over on Teacher Tom's blog.  Oh my robot goodness.  We did ours a little differently than his, you should definitely see how he made his for the kids in his school. 
My son is a total tinker/builder/creator so we had an Erector Set with a motor in it. We simply taped the motor onto the top of a plastic cup and taped markers to the sides of the cup.  I covered our kid table with paper and taped it down.  Then we set the robot on the table and turned it on.  It was so cool!  My son was thrilled!  There really isn't much for the kids to do once it is set loose on the table, but we had fun predicting what shapes and patterns it would create and if we moved it what would happen.  It was a great experiment!  We will be doing this often!


Pin It