Showing posts with label shapes. Show all posts

Thursday, November 1, 2012

Yummy Play Dough

Have you seen these Duncan Hines frosting flavors?  You can add them to frosting to create your own flavor of icing.  Well, I had picked up a couple different flavors (they are .99 at our local grocery store).  While making play dough for class one morning, I remember them sitting unused in the pantry and I imagined the yummy scent they would add to it.   Simply mix into your favorite play dough recipe.  It was a huge hit.  Use any flavor you wish, I didn't even add coloring to this batch.  
 
 
Here is my absolute favorite recipe....
 
2 cups flour
1 cup salt
4 tsp cream of tartar
Duncan Hines Frosting Creations packet
2 tsp cooking oil
1 1/2 cups of boiling water
a few drops of glycerin
 
 
Mix all the dry ingredients, then add the boiling water and oil
Mix it all until it forms a ball, you may need to add flour or more water as needed.
When it is all mixed, add a few drops of glycerin (you can find it in the medicine aisle at the grocery store, makes a huge difference in your play dough!  I highly recommend using it)
 
This play dough will last a long time.  Keep it in an airtight container, I use a zip lock bag!

Pin It

Monday, August 13, 2012

DIY Australian Bilma's

We love making our own musical instruments.  I love when the kids can use their creativity and really get involved in the process of creating something they can use.  When Daria over at Daria's Music, offered to send us our own Australian Bilma's to make, I was super excited.  You can click HERE to find out more about the Bilma, and how to make your own.  Daria was kind enough to send us the wooden sticks and the paint to use.  Traditional Bilma's are decorated with stripes and dots. 

 Here are the bare sticks.
I painted them white to give us a blank canvas.  My daughter painted hers red. 
 After the coat of red dried, she started to add dots.  I don't know if you have ever painted on a cylinder object, but it isn't that easy, especially for a 4 year old.  We put aside the one with dots, to add some yellow to the other Bilma. 

She grew impatient waiting for the paint to dry so she developed her own painting technique.  I loved watching her problem solve and discover the best way for her to paint her Bilma. 
She put dots on the tray.... 
then rolled the Bilma into the paint. 
Here she used the paint to draw a line of purple on the tray.... 
and rolled the Bilma's into it.. 
We stood them up in an egg carton to dry.  
We hot glued on a little ribbon to add some pizazz.  
She loves them!!  I think they are beautiful.  So fun.   
Here are our finished Bilma's!  Beautiful, I think! 

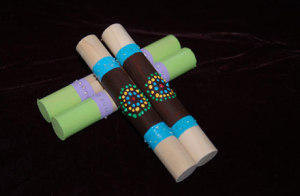
Daria is doing a giveaway for a pair of Bilma's over on her website.  She is giving away these,
Aren't they lovely?
You can read all about how to enter HERE.
You should go over and spend some time on her website.  She has some wonderful ideas for making musical instruments for children (and adults too).

Thank you again, Daria for introducing us to the Bilma's.  I will be making more for my class. 
Pin It

Friday, July 20, 2012

Let Them Roll, Easy Marble Run

This is about as easy as it gets and occupied my kids for a very long time.  They get this out a lot!
All you need it a pool noodle, some marbles and something to catch them in (or not).  I used a roasting pan because the kids were able to hear the marble "ting" at the bottom.  My two created marble races, and discovered which marbles fit down the noodle, which ones got stuck and which ones went fast!  So fun, cheap, easy and all sorts of skills being used.   Some of the skills are cause and effect, small motor, cooperation, language development, comparing and contrasting, hand/eye coordination, sensory, shapes, oh so many skills!


Pin It

Tuesday, June 19, 2012

Water Wall and Ice Balls

I have seen lots of water walls around like this ONE from Play Based Learning or this ONE from Teach Preschool, (both amazing and inspiring websites).  I have been wanting to try it but wasn't sure how to execute it on our wooden fence.  While cleaning out the shed, I found a box of storage containers and decided it was the perfect time to try it.  I used little nails and hammered the plastic containers to our fence.  Then I filled our table with water, although you can use whatever you have, of course.  I had made these giant ice balls (just fill a balloon with water and add a few drops of color), and was planning on using them in the sand box, but put them in the water instead.  It was huge hit with my son and a great way to cool off on a hot day!


Pin It

Tuesday, June 12, 2012

Rock Houses

If you have been following me for any length of time, you know that I am all about recycling and cheap!  I don't know if I can get any cheaper than this and my kids love this play set.  We washed out some juice and milk cartons, cut them in half and painted them with craft paint.  Then, we cut doors into our little "houses" and added some little details.  Next, we went out into the yard in search of some smallish rocks.  We looked for ones that we were able to stand up.  Then we painted those, added googly eyes and drew on mouths.  Voila!  Done and done.  Cute little play houses for our little pet rocks.  So fun, so cheap and recycling at the same time.  What's not to love??


Pin It

Saturday, March 31, 2012

Drawing Robot

I was totally in awe and inspired when I saw these "ART BOTS" over on Teacher Tom's blog.  Oh my robot goodness.  We did ours a little differently than his, you should definitely see how he made his for the kids in his school. 
My son is a total tinker/builder/creator so we had an Erector Set with a motor in it. We simply taped the motor onto the top of a plastic cup and taped markers to the sides of the cup.  I covered our kid table with paper and taped it down.  Then we set the robot on the table and turned it on.  It was so cool!  My son was thrilled!  There really isn't much for the kids to do once it is set loose on the table, but we had fun predicting what shapes and patterns it would create and if we moved it what would happen.  It was a great experiment!  We will be doing this often!


Pin It

Thursday, March 29, 2012

Stringing Eggs

I saw this idea on Pinterest.  I was thinking this would be a fabulously fun, fine motor and math activity for my snake happy son.  We used plastic eggs and a pipe cleaner for ours, but you can see the original idea HERE.  I made a small knot at the end of the pipe cleaner so the egg ends wouldn't slip through.


I was thinking they looked a little like caterpillars, but Tayler saw his as a cobra snake.  So he stuck one of the eggs on the opposite way to create it's "hood".  Then he added eyes and left the pipe cleaner sticking out for the tongue.  Pretty dang cute cobra to me!
Another great fine motor skill.  You could incorporate patterning and counting into this as well.
Pin It

Wednesday, March 21, 2012

Silly Face Egg Matching

We saw these silly face eggs at the grocery store and I couldn't pass on them.  We came home and I plopped them into an egg carton.  The children quickly began sorting and matching them by the facial expression.  The funniest part was watching them try to make the faces themselves!  Haha!  "This one is mad, this one is scared".  Fun and easy, math, matching, language, colors, and sensory!


Pin It

Friday, February 17, 2012

Cake Mix Playdough

I got this fabulous recipe from Lisa Murphy's Ooey Gooey Tooey book.   You will need:
1 box of cake mix (any type will do)
2 cups of flour
1 1/2 cups of salt
6 tsp of cream of tartar
6 tbls oil
3 cups of water
Mix it all in a bowl (we used an electric mixer).  Then pour into a pot and cook on medium heat until the dough begins to form a ball.  Plop it on the counter and let it cool.  Knead until it is soft and pliable. This play dough, if kept in an airtight container) will last for weeks.  It is so fun and smells incredible.


Pin It

Friday, February 3, 2012

Flyswatter Painting (minus the paint)

We love painting (well, whacking) with flyswatters.  I love doing this activity outside, well because, it's MESSY!  I don't care about messes usually, they clean up, the memories that we create last forever!  However, cleaning paint off my floors and cabinets takes time away from playing with my kids.  Sooooo, we did flyswatter painting with WATER!  It was a lot of fun too.  We still had the satisfaction of whacking,  splattering and making prints, yet virtually no cleanup.  We loved talking about evaporation and absorption AND we we able to swat all we wanted because our work kept disappearing! 
All you need is some big paper, fly swatter and a shallow pan of water.  I used a cookie sheet with just enough water to get the swatter wet. 
 Have at it kids!


Pin It

Tuesday, December 13, 2011

Candy Trees

I saw these on Pinterest and knew they were something we just had to try.  How cute are they?  All you need is a couple old fashion ice cream cones (the cone shaped ones, obviously), some frosting and whatever candy you want.  You could use M&M's, gumdrops, peppermints.  We used Skittles.  We tinted the frosting yellow, I asked the kids what color they wanted their trees and that is what they chose.  Then we frosted the cone, placed it on a paper towel and added the details.  So simple and
 "kid-friendly" as my friend stated! 


Pin It