Showing posts with label imaginative play. Show all posts

Thursday, November 1, 2012

Yummy Play Dough

Have you seen these Duncan Hines frosting flavors?  You can add them to frosting to create your own flavor of icing.  Well, I had picked up a couple different flavors (they are .99 at our local grocery store).  While making play dough for class one morning, I remember them sitting unused in the pantry and I imagined the yummy scent they would add to it.   Simply mix into your favorite play dough recipe.  It was a huge hit.  Use any flavor you wish, I didn't even add coloring to this batch.  
 
 
Here is my absolute favorite recipe....
 
2 cups flour
1 cup salt
4 tsp cream of tartar
Duncan Hines Frosting Creations packet
2 tsp cooking oil
1 1/2 cups of boiling water
a few drops of glycerin
 
 
Mix all the dry ingredients, then add the boiling water and oil
Mix it all until it forms a ball, you may need to add flour or more water as needed.
When it is all mixed, add a few drops of glycerin (you can find it in the medicine aisle at the grocery store, makes a huge difference in your play dough!  I highly recommend using it)
 
This play dough will last a long time.  Keep it in an airtight container, I use a zip lock bag!

Pin It

Saturday, October 13, 2012

Mail Call


We have been discussing Community Helpers in class. Here is a simple, easy, and fun way to let the kids practice their organizing, counting, and number recognition skills.  I have saved these cool boxes that single paper towels come in (by Kleenex).  I knew they would make a great mailbox.  I wrote numbers on cards and taped them to the front of the box.  Then I used foam numbers and drew dots to correspond to the numbers on the boxes.  The kids came to the table and sorted the mail into the correct boxes.  They loved it is an understatement.  They sorted, emptied and sorted again! 


We continued our unit on Mail Carriers by writing cards to ourselves and taking a walk to the mailbox.  The kids were very excited to come back to school with their delivered card!


Pin It

Thursday, August 23, 2012

Beans and Tractors

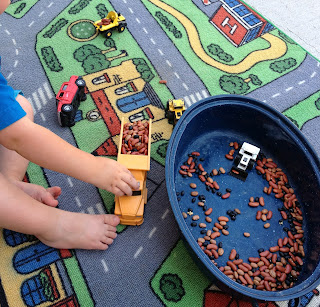
This little man loves his tractors, and backhoes, and bulldozers and whatever big machinery you can think of.  He is always looking for things to load into his play trucks. I grabbed some beans that I keep just for play (cost about $2 dollars at the grocery store) and poured them into a pan for him.  He has played with this for days on end.  Loading, dumping, pushing. using his fine motor skills, problem solving, learning cause and effect, involving all his senses.  Who knew a bag of beans and some toy tractors could be educational.  It may look like he is only "playing" but he is learning, with every push, dump and scoop.  By the way, this little man is almost 2, in case you were wondering.  My almost 6 year old had almost as fun as the 2 year old. 


I store my "play" beans in recycled Gatorade bottles.  This is how I store my other items such as colored rice and pasta, aquarium rocks and whatever else we use in our sensory tubs.  It is easy to see what is in them and they line up nicely on the shelf.  You can also just let the kids play with the full bottles, with the lids tightly on. 

Pin It

Thursday, July 26, 2012

Cork Boats

Have you visited A Little Learning for Two? If not, you should.  I saw these cork boats on her blog and thought they look super fun.  I borrowed a couple corks from our fabulous neighbors (along with their kids, thanks Kylea and Justin!).  The kids had a terrific time designing and creating their boats.  Here is what we used to make them.
-corks
-toothpicks
-craft sticks
-hot glue
-craft foam sheets
-screw in hooks
-yarn

I placed everything out on the table and invited the kids to design their boat using the materials on the table.  They did an amazing job.  I didn't provide them with any type of model, they came up with the design by working together and problem solving their way through the construction. 

We used hot glue to glue the sticks to the corks.

Screwed the hook into the front of the boat,

Here is one finished, they cut out their sails however they wanted.then I showed them how to fold it in half and push the toothpick in.  They did need a little help pushing the toothpick into the cork to hold the sails up.

Here is one that the girls designed.  I love it.  All about balance!

Here it is floating away in the little pool.

They even gave them a ride down the slide.

T designed his as a pirate ship.

They were a great hit, from start to finish! These were great for a warm summer day.  Now to go get some more corks (wink wink).


Pin It

Tuesday, June 12, 2012

Rock Houses

If you have been following me for any length of time, you know that I am all about recycling and cheap!  I don't know if I can get any cheaper than this and my kids love this play set.  We washed out some juice and milk cartons, cut them in half and painted them with craft paint.  Then, we cut doors into our little "houses" and added some little details.  Next, we went out into the yard in search of some smallish rocks.  We looked for ones that we were able to stand up.  Then we painted those, added googly eyes and drew on mouths.  Voila!  Done and done.  Cute little play houses for our little pet rocks.  So fun, so cheap and recycling at the same time.  What's not to love??


Pin It

Tuesday, May 1, 2012

5 Little Speckled Frogs

Let me preface this post with....I am no artist!  I actually am not very crafty either.  I can come up with ideas and they look great in my head, but when they come to life, ummm, not exactly like it was in my head.  Anyway, we love singing the song "5 Green and Speckled Frogs". So I thought it would be fun to have a little visual to go along with it.  I created these little frogs on a log
puppets for the kids to use. It was super simple and made with what I had on hand. 
I cut a egg carton up into 10 cups, then painted them green.  I added some speckles with green marker.  Then I cut out red tongues and glued them in.  I glued the cups together and added some goggle eyes.  I cut out a "log" from the egg carton and painted it brown. Voila!  Done.
Here is a video of the song in case you have no idea what I'm talking about....


Check out the adorable frogs that they created over at Rainy Day Mum with egg cartons and a paper towel roll!  So cute!
Pin It

Monday, April 16, 2012

Colored Rice (The Easiest Way)

One of my kids most favorite sensory materials is colored rice.  It feels nice and makes a pleasant, soothing noise when dumping, measuring and pouring.  Playing with these types of materials help build math skills, small motor skills, color recognition, sensory awareness and language development.
 When I first began coloring rice, I use to put it in a ziplock baggie, add the color, add rubbing alcohol, zip it up, shake it, dump it out on paper towels to dry and try to keep the fumes from burning my eyeballs!  One day, I didn't have any rubbing alcohol, so I just added the color.  Much easier!
First, gather your colors.  We used THESE watercolors from Discount School Supply.  The process is super simple.  Pour some white rice (we bought a medium size bag at the grocery store for about $4), into a bowl.  We didn't measure, just poured in a good amount. 

Squeeze in some color
Stir it up (no need to add alcohol)  If you want it darker, just add more watercolor

Dump it into your tub and add the next color, no need to even rinse the bowl out, and the rice is instantly dry!


The colors come out beautiful and no stinky alcohol smell. 

Just a quick note, this batch of rice got caught outside in a rain storm  We let it dry out and it is perfect again.  It will last indefinitely, so this is a great little investment that goes a loooonnnngggg way

P.S.  This method works for coloring any pasta too!  You know for all those noodle collages and necklaces! 


Pin It

Thursday, March 29, 2012

Stringing Eggs

I saw this idea on Pinterest.  I was thinking this would be a fabulously fun, fine motor and math activity for my snake happy son.  We used plastic eggs and a pipe cleaner for ours, but you can see the original idea HERE.  I made a small knot at the end of the pipe cleaner so the egg ends wouldn't slip through.


I was thinking they looked a little like caterpillars, but Tayler saw his as a cobra snake.  So he stuck one of the eggs on the opposite way to create it's "hood".  Then he added eyes and left the pipe cleaner sticking out for the tongue.  Pretty dang cute cobra to me!
Another great fine motor skill.  You could incorporate patterning and counting into this as well.
Pin It

Wednesday, March 21, 2012

Silly Face Egg Matching

We saw these silly face eggs at the grocery store and I couldn't pass on them.  We came home and I plopped them into an egg carton.  The children quickly began sorting and matching them by the facial expression.  The funniest part was watching them try to make the faces themselves!  Haha!  "This one is mad, this one is scared".  Fun and easy, math, matching, language, colors, and sensory!


Pin It

Friday, March 9, 2012

Monster Truck Derby with Smashable Aluminum Cars

Recently, we went to a Monster Truck show, where the huge trucks were jumping over and smashing into junk cars.  Ever since then, my son has been creating his own monster truck shows.  The issue was his little cars would not smash!  So my husband came up with aluminum molds to jump and crash over.  Genius!!  He cut a small piece of aluminum foil and pressed it on top of the car, creating an imprint of it.  Then, my son lined them up and smashed away.  The super thing about this is that the cars can be "created" over and over again.  Serious fun!
Let the Smash Up Derby Begin!!!


Pin It