Friday, December 31, 2010

Letter Bingo

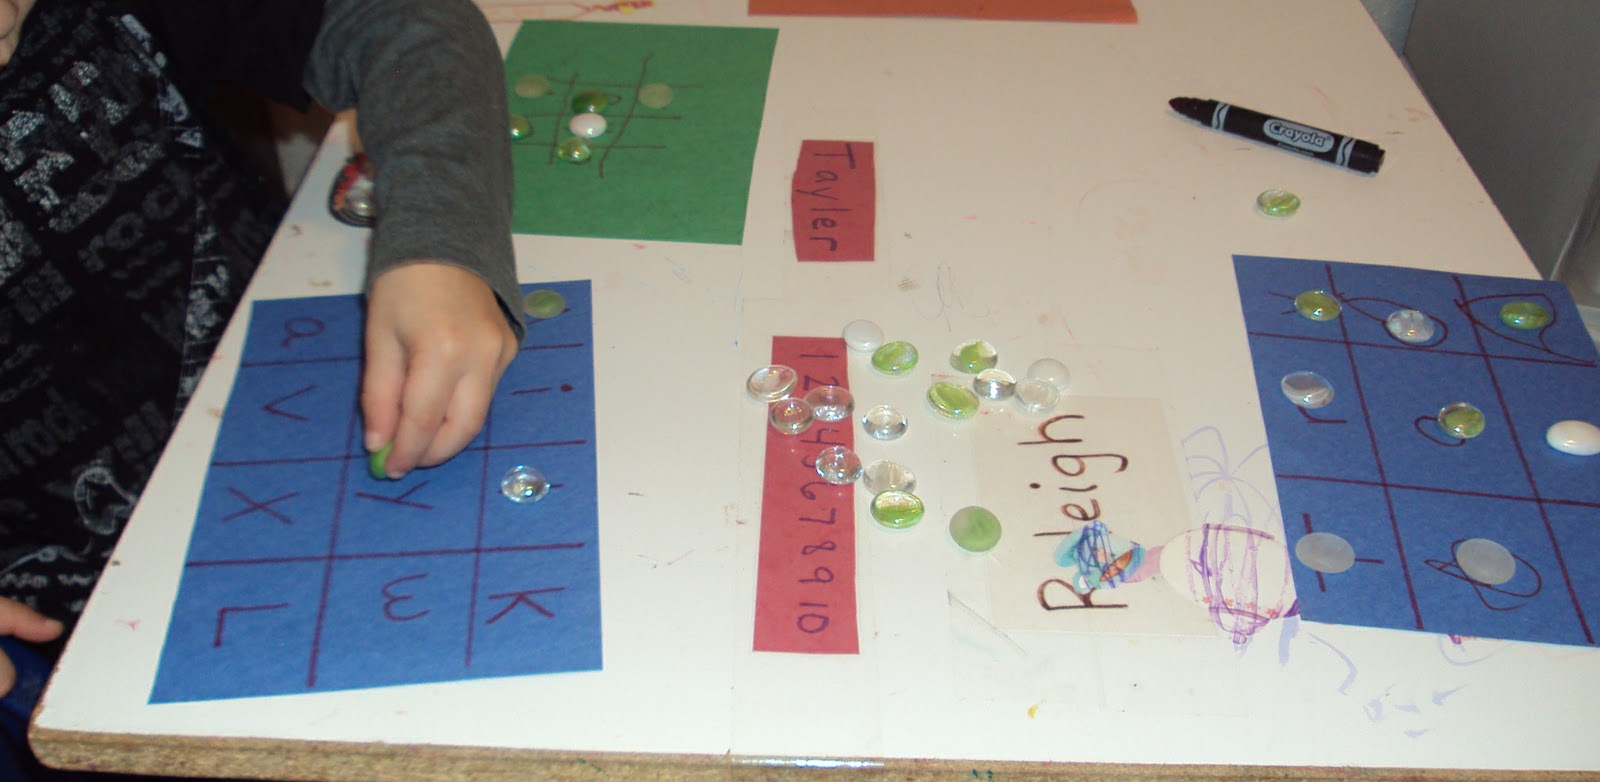
My son has been very interested in learning his letters so we set up this little game to reinforce the ones he has been learning.  I made one "bingo" card with the letters of his name but he decided to make his own.  Then I called out the letters and he put a sea glass on it.  Then I made another card with some other letters on it.  Again, I would call out a letter and he would put a sea glass on top of the letter.  I had the letter puppets nearby in case he needed help identifying one of them.  The best part was him yelling "BINGO" when he filled up his card.  Too cute!


Pin It

Thursday, December 30, 2010

Creating Carbon Dioxide.....and Fun!

We really love the good old erupting volcano using baking soda and vinegar but since our sand box is snowed in I wanted to try an indoor, mini version.  I poured baking soda into a tin baking tub.  Then we put vinegar in little cups with a little food coloring.  Using pipettes (droppers), we dropped the vinegar into the baking soda causing little eruptions.  It was super fun and exciting and we ended up using an entire box of baking soda.  My son kept yelling "look, I'm making carbon dioxide".  It also makes a super, slimy mixture that is fun to stir and mix. 


Pin It

Wednesday, December 29, 2010

Uppers and Lowers

We used our feeley box to do a upper and lower case matching game.  We laid out all the upper case letters (I have some foam letters that I glued to craft sticks to use as letter puppets).  We then put the lower case letters in the feeley box.  T would pull out a letter and match it to it's uppercase letter.  He loves this game and takes it out quite often.  You could use whatever letters you have, magnet, puzzle pieces..whatever.  If you don't have a box with a hole, you could always use a sock to hide stuff in. 


Pin It

Tuesday, December 21, 2010

Hello....Can You Hear Me?

I don't know how many of you made these when you were kids, but me and my siblings tried it many times.  We used tin cans with the sharp edges though (gasp)!  I just knew my two would have a blast with these.  I took two clean yogurt containers and poked holes in the bottom.  I put a piece of yarn through the bottom of them and tied the yarn to toothpicks to hold it in place.  This was a great science experiment in getting the sound vibrations to travel down the yarn.  We learned that you need to hold the string tight and face the direction of the person holding the other cup.  It was super fun!!  My son was amazed and I am so happy I captured that on his face in the pictures.


Pin It

Sunday, December 19, 2010

Goody, Goody, Gumdrops

I have made these for many years with the kids in my classes and now, finally, my own two are old enough to enjoy making them too.  I gathered up some Styrofoam cones and gumdrops.  I snapped the toothpicks in half to make them easier to stick in.  This is so simple and fun.  A great fine motor and color identifying activity.  It was also a good lesson in balance for my son.  He quickly discovered  when he only put gumdrops on one side of the tree, it became uneven and fell over.  They make a unique candy holder.  We just made these this morning and the trees are already looking a little bare.  I think kids of every age would have fun making/eating these.  You could use the bigger gumdrops too.  We tried using marshmallows but that wasn't such a great idea after all.


Pin It

Friday, December 17, 2010

3d Trees

I found these cute 3d trees at Enchanted Learning and had the perfect plan for them.  I used card stock but you could use just regular construction paper too.  I had these tiny gift bows that I found at the discount store for $1 a package.  I also cut out pictures of presents from scrap wrapping paper.  Then, the kids got busy unsticking the bows and taping the presents to the tree. 
I think they came out super cute. 
First, you fold two pieces of paper in half.  Then, draw a half of tree shape and cut it out.  Cut half way up the bottom of one tree and half way down the top of the other, slide them together.  I added tape to the four sides just to add some strength to them.


Pin It

Wednesday, December 15, 2010

Mr Roboto

My son has been obsessed with robots lately and makes them out of whatever he can find.  I cut out some rectangles of his color choice for him to make a paper robot.  I just set out the pieces and he put it all together as he wanted.  R, of course, had to make a pink one.  I am so impressed with these cute, little guys.  I just had to give them a special place in a nice frame. 

Look at the tongue.  Such concentration!

Pin It

Monday, December 13, 2010

Star Finder

I was inspired with this idea the other night.  My son and I were outside looking at the stars and I was trying to show him the pictures in the stars, or the constellations.  He is very interested in the planets, sun, moon, rockets, etc.  So I had the idea to make our own with a flashlight.  We took a piece of paper and poked holes in it.  We used a pencil first to see what size they would make.  Then, I took an empty oatmeal container and cut out the bottom.  We taped the hole punched paper to the top and shined the flashlight through while in a dark room.  It was a big hit.  Then T wanted to make more "poke" pictures.  He drew this great rocket and I punched holes on his lines with a tiny  Philips head screwdriver. Then we went back into the dark room.  Voila!  A rocket on the wall.  It was so fun.  While we were racing the rocket on the walls, the kids began a game of "Smash"!  One of them held the flashlight and the other would try to "smash" the light on the wall.  That was hysterical!  I love when one thing creates another.  I took pictures of them playing in the dark, but those didn't quite come out right.  Hope you get the idea anyway.


Pin It

Saturday, December 11, 2010

PB&J by the Numbers

Since my son is so interested in numbers and counting, I made this little game for him. I thought it would be fun to use his favorite food right now....peanut butter sandwiches.  I cut out shapes that resembled slices of bread, jelly and peanut butter.  Then I numbered two "slices", jelly and peanut butter with the same number.  I also added the dots so he could check which number is which.  I am slowly adding numbers as he progresses.  We started with 1-6.  Now, we are up to 12.  Even my two year old matches the "picture numbers". 


Pin It

Friday, December 10, 2010

Rein "Dear"

Today, we made the cutest, lil' reindeer faces.  R choose which color she wanted (pink, of course) and I traced her hands and foot onto it.  Then we cut them out and she glued them onto another piece of background paper.  She added some eyes and a shmuzzy nose.  I just love this little "dear"!


Pin It

Monday, December 6, 2010

Zip Line

OK, so this one was all my son's idea.  He was busy gathering up items, asking me for this and that. I was busy cleaning up the kitchen from dinner and not really paying too much attention to what he was doing.  He went to the cabinet and got a plastic bottle and put a pipe cleaner around the top of it.  Then, he set up two of our dining chairs and "tied" a ribbon between them.  He was busy making an "obstacle course" he then stated to me.  After a few tries, he began to get frustrated that his bottle wasn't going down.  It then became clear that he was trying to make a zip line for his plastic bottle to travel on.  Dad to the rescue!  He found some florist wire in my craft cabinet and tied it to the cabinet and the bottom of the kids play horse.  Dad then helped bend the pipe cleaners into a hook so they could easily slide down the wire.  The rest was the kids.  T set up a box and another bottle to be knocked over by the flying bottle.  I am not even kidding when I say they played with this all evening and protested strongly when it was time for bed.  I promised that it would stay up as long as they wanted it too.  Excellent science activity for a lesson in gravity and inertia. 


Pin It

Saturday, December 4, 2010

Shmuzzy Tree

I know, I know what it looks like but.......I did not specify what we were "making" to my kids.  I cut a toilet paper roll in half and hot glued the pine cone onto it.  I have seen these somewhere in blog land, but cannot find where I first saw them!  So, I am sorry for not giving credit.  I gave the kids the pine cones, a bowl of shmuzzies, some glue and pieces of a plastic necklace that broke.  What they came up with was all them.  I asked T if it was a "Christmas Tree" and he said, matter of fact, "It's a Shmuzzy Tree".  Well, duh!  Of course it is!


Pin It