Wednesday, October 31, 2012

Painting With Pumpkins

Want a fun way to use up those pumpkins?  Use them for painting!  After we used ours for hammering golf tees, cut them open, examined the innards, roasted the seeds, I cut the pumpkin into small chunks.  Then I cut off a little of the inside to make them flat-ish, stuck a craft stick into the top, added some orange paint and voila....a new sensory/art/pre-writing experience!  


the top of the pumpkin has a nice built in handle, this was the favorite piece for the kids


Pin It

Sunday, October 21, 2012

Golf Ball Paintings

This is a different version of the tried and true "marble painting".  We used golf balls.  The kids had a "ball"!  We used a deep tub, placed a piece of paper in, let the kids squirt in their colors, toss in the balls and roll away!  Great for cause and effect, problem solving, color mixing, creativity and large motor coordinations


Pin It

Saturday, October 13, 2012

Mail Call


We have been discussing Community Helpers in class. Here is a simple, easy, and fun way to let the kids practice their organizing, counting, and number recognition skills.  I have saved these cool boxes that single paper towels come in (by Kleenex).  I knew they would make a great mailbox.  I wrote numbers on cards and taped them to the front of the box.  Then I used foam numbers and drew dots to correspond to the numbers on the boxes.  The kids came to the table and sorted the mail into the correct boxes.  They loved it is an understatement.  They sorted, emptied and sorted again! 


We continued our unit on Mail Carriers by writing cards to ourselves and taking a walk to the mailbox.  The kids were very excited to come back to school with their delivered card!


Pin It

Tuesday, September 11, 2012

We will return to your regular scheduled program shortly......

Wow! Life has gotten crazy busy lately. I apologize for the long delays between posts. I will be taking a break from blogging for a bit to focus on my newly opened preschool and all of those little folks who are occupying it! As well as, my own family. Hopefully, I will return in October with loads of new ideas to share with you all.  Until then, please poke around the blog a bit to find some cheap, quick, easy and engaging activities for the small people in your life!  See you all soon!
Sincerely,
CariPin It

Thursday, August 23, 2012

Beans and Tractors

This little man loves his tractors, and backhoes, and bulldozers and whatever big machinery you can think of.  He is always looking for things to load into his play trucks. I grabbed some beans that I keep just for play (cost about $2 dollars at the grocery store) and poured them into a pan for him.  He has played with this for days on end.  Loading, dumping, pushing. using his fine motor skills, problem solving, learning cause and effect, involving all his senses.  Who knew a bag of beans and some toy tractors could be educational.  It may look like he is only "playing" but he is learning, with every push, dump and scoop.  By the way, this little man is almost 2, in case you were wondering.  My almost 6 year old had almost as fun as the 2 year old. 


I store my "play" beans in recycled Gatorade bottles.  This is how I store my other items such as colored rice and pasta, aquarium rocks and whatever else we use in our sensory tubs.  It is easy to see what is in them and they line up nicely on the shelf.  You can also just let the kids play with the full bottles, with the lids tightly on. 

Pin It

Monday, August 13, 2012

DIY Australian Bilma's

We love making our own musical instruments.  I love when the kids can use their creativity and really get involved in the process of creating something they can use.  When Daria over at Daria's Music, offered to send us our own Australian Bilma's to make, I was super excited.  You can click HERE to find out more about the Bilma, and how to make your own.  Daria was kind enough to send us the wooden sticks and the paint to use.  Traditional Bilma's are decorated with stripes and dots. 

 Here are the bare sticks.
I painted them white to give us a blank canvas.  My daughter painted hers red. 
 After the coat of red dried, she started to add dots.  I don't know if you have ever painted on a cylinder object, but it isn't that easy, especially for a 4 year old.  We put aside the one with dots, to add some yellow to the other Bilma. 

She grew impatient waiting for the paint to dry so she developed her own painting technique.  I loved watching her problem solve and discover the best way for her to paint her Bilma. 
She put dots on the tray.... 
then rolled the Bilma into the paint. 
Here she used the paint to draw a line of purple on the tray.... 
and rolled the Bilma's into it.. 
We stood them up in an egg carton to dry.  
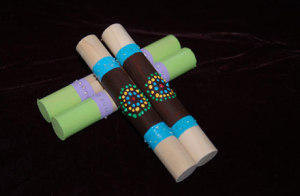
We hot glued on a little ribbon to add some pizazz.  
She loves them!!  I think they are beautiful.  So fun.   
Here are our finished Bilma's!  Beautiful, I think! 

Daria is doing a giveaway for a pair of Bilma's over on her website.  She is giving away these,
Aren't they lovely?
You can read all about how to enter HERE.
You should go over and spend some time on her website.  She has some wonderful ideas for making musical instruments for children (and adults too).

Thank you again, Daria for introducing us to the Bilma's.  I will be making more for my class. 
Pin It

Tuesday, July 31, 2012

Target Practice with Wet Sponges

We had so much fun with this activity.  First we soaked a couple sponges in a tub of water.  The kids drew their own targets on the fence with chalk.  Then, they took aim and threw the wet sponges at their target.  They problem solved the best angle to throw the sponge so it would stick to the fence.  This is great for hand/eye coordination, problem solving, fine motor skills, large motor skills, not to mention, a fun way to stay cool on a hot day (it didn't take long before the kids were using each other for targets).  All in good fun, of course! 


Pin It

Thursday, July 26, 2012

Cork Boats

Have you visited A Little Learning for Two? If not, you should.  I saw these cork boats on her blog and thought they look super fun.  I borrowed a couple corks from our fabulous neighbors (along with their kids, thanks Kylea and Justin!).  The kids had a terrific time designing and creating their boats.  Here is what we used to make them.
-corks
-toothpicks
-craft sticks
-hot glue
-craft foam sheets
-screw in hooks
-yarn

I placed everything out on the table and invited the kids to design their boat using the materials on the table.  They did an amazing job.  I didn't provide them with any type of model, they came up with the design by working together and problem solving their way through the construction. 

We used hot glue to glue the sticks to the corks.

Screwed the hook into the front of the boat,

Here is one finished, they cut out their sails however they wanted.then I showed them how to fold it in half and push the toothpick in.  They did need a little help pushing the toothpick into the cork to hold the sails up.

Here is one that the girls designed.  I love it.  All about balance!

Here it is floating away in the little pool.

They even gave them a ride down the slide.

T designed his as a pirate ship.

They were a great hit, from start to finish! These were great for a warm summer day.  Now to go get some more corks (wink wink).


Pin It